Recently I have taken up drawing in pen and ink as an inexpensive, relaxing, creative activity. I have never been much of a “classic” artist, but I figured that there are a lot of styles and techniques out there, and with some practice I could be good one.
No matter what technique of drawing you use, one of the most important basic concepts to employ is what I call “seeing in shapes.” This is when you can look at a model of what you are drawing, or lay out your drawing in the shapes it is broken down in first.
It can be overwhelming to dive right into a massive landscape, for example, with intricate details and colors. However, when you see in shapes it becomes much more manageable. Even drawing something simple, breaking it down into shapes can be very helpful.
Let’s take this flower:
Now break it down. It should look something like this:
It’s not the most beautiful or accurate flower in the world, but it has good shape to be the building blocks of whatever your personal style is. From here, this flower can become a realistic study, a cartooned delight, a modern reinterpretation, etc. With good bones, this flower can become good art.
Showing posts with label general. Show all posts
Friday, April 4, 2014
Thursday, April 3, 2014
Cats and Crafts
Cats are the most dangerous natural predator to the unsuspecting craft. Many an innocent crochet project has been turned to nothing better than a tangled mess of string and broken dreams in the vicious paws of these ferocious beasts. However, every once in a great while, the crafts manage to outsmart their nemesis, besting it while it lays bloated on expected victory.
Observe the cat and its prey in their natural habitat: my kitchen table.
The cat lays atop its latest conquest: fabric laid out to be cut.
Sated and filled with the glorious fruits of victory, the cat dozes...
This was a mistake! The crafts choose this time to strike, when the cat is vulnerable and unsuspecting.
Pinned down by pattern pieces and his own treacherous pride, the cat cannot put up a defense. Soon, he is rendered blind.
Helpless and trapped, the crafts proceed to consume the cat, turning nature on its head in an epic and mysterious circle of life.
***No animals or crafts were hurt in the making of this documentary.***
Observe the cat and its prey in their natural habitat: my kitchen table.
The cat lays atop its latest conquest: fabric laid out to be cut.
Sated and filled with the glorious fruits of victory, the cat dozes...
This was a mistake! The crafts choose this time to strike, when the cat is vulnerable and unsuspecting.
Helpless and trapped, the crafts proceed to consume the cat, turning nature on its head in an epic and mysterious circle of life.
***No animals or crafts were hurt in the making of this documentary.***
Wednesday, April 2, 2014
Balance
A short note about the artistic concept of Balance. Balance is defined as the way in which the elements of a piece are arranged. Balance can be symmetrical or asymmetrical, and is used in absolutely all craft designs, whether you realize it or not.
Symmetrical balance is usually considered more formal, classic, and stately. This is when all elements are laid out with equal weight such as in this picture:

Asymmetrical balance is less formal, and, depending on the extent of the asymmetry, can be whimsical, or downright absurdest. Asymmetry also tends to make a piece feel more dynamic. This is when elements of the design are laid out with varying weights and proportions such as in these pictures, arranged from least to most asymmetrical:


There are, of course, more design elements involved in balance than just symmetry or lack thereof, but it is a good place to start. Once you decide the overall balance of a piece, you can worry about radial or lineal symmetry, space and color. Planning out the balance of a piece can help to find your artistic voice, and convey it more clearly.
Symmetrical balance is usually considered more formal, classic, and stately. This is when all elements are laid out with equal weight such as in this picture:
Asymmetrical balance is less formal, and, depending on the extent of the asymmetry, can be whimsical, or downright absurdest. Asymmetry also tends to make a piece feel more dynamic. This is when elements of the design are laid out with varying weights and proportions such as in these pictures, arranged from least to most asymmetrical:
There are, of course, more design elements involved in balance than just symmetry or lack thereof, but it is a good place to start. Once you decide the overall balance of a piece, you can worry about radial or lineal symmetry, space and color. Planning out the balance of a piece can help to find your artistic voice, and convey it more clearly.
Sunday, April 14, 2013
Luggage Helper
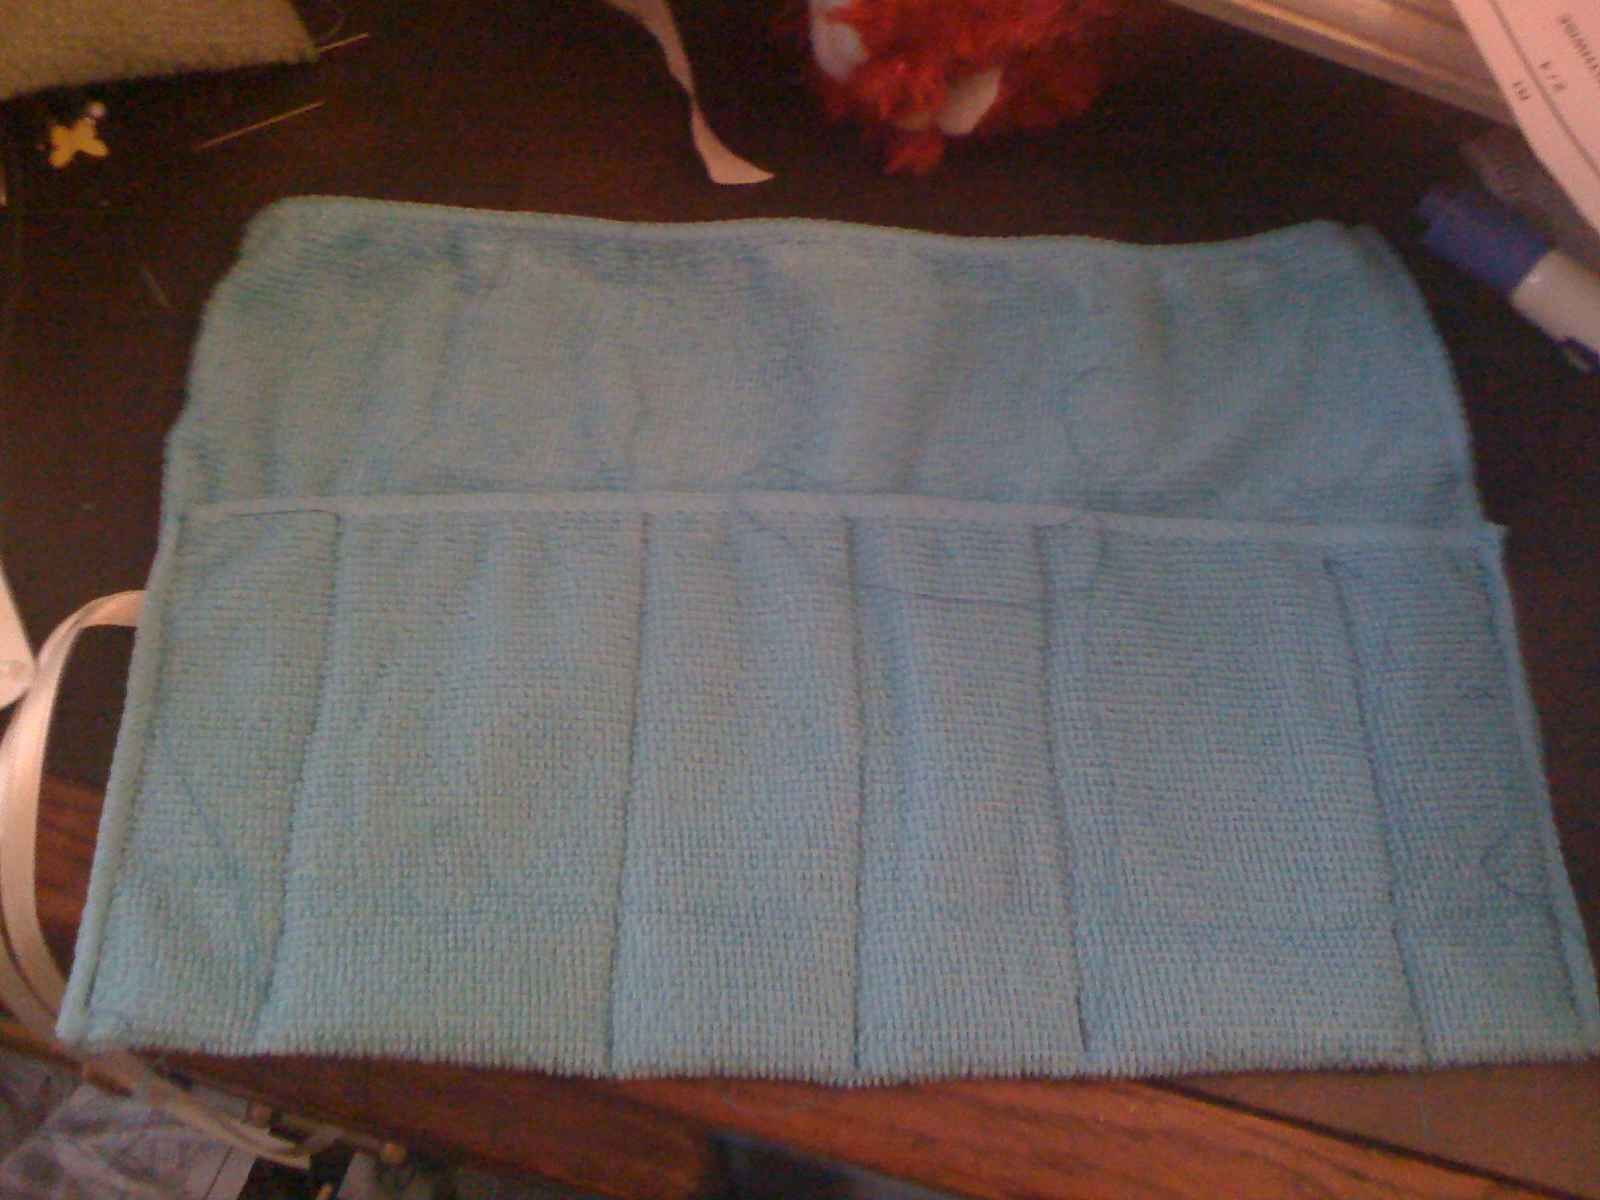
Saw this idea on Pinterest, to make a travel kit from a washcloth, and thought I could add my own little flare to it.
The idea is to make a toothbrush and odds and ends holder that will absorb the water and keep your travel accessories nice and neat.
They are super simple to make, and are great gifts!
You will need:
A washcloth (I got a set of four from the dollar store)
Matching Thread
A needle
A few pins
An 18" length of ribbon
Some scrap fabric
Step 1: Fold the washcloth, leaving about 2 inches at the top. Pin in place. Fold the ribbon in half and pin about half-way up one side. Sew up both side edges.
Step 2: Sew 3-4 lines into the folded part of the washcloth, forming the pockets.
(You can be done now if you do not want to personalize your kit)
Optional Step 3: Cut an initial or simple design from your scrap fabric. Pin to the backside, above the pockets. Applique in place.
Optional Step 4: Tuck a small toothbrush, a comb, toothpaste, a handful of band-aids, a travel pack of Advil, etc. Keep it for yourself, or give as a great gift! I made one of these up for my mom, husband, brother, etc, in lieu of Easter baskets this year, and tucked candy bars in with the other goodies! They were a huge hit.
The idea is to make a toothbrush and odds and ends holder that will absorb the water and keep your travel accessories nice and neat.
They are super simple to make, and are great gifts!
You will need:
A washcloth (I got a set of four from the dollar store)
Matching Thread
A needle
A few pins
An 18" length of ribbon
Some scrap fabric
Step 1: Fold the washcloth, leaving about 2 inches at the top. Pin in place. Fold the ribbon in half and pin about half-way up one side. Sew up both side edges.
(You can be done now if you do not want to personalize your kit)
Optional Step 3: Cut an initial or simple design from your scrap fabric. Pin to the backside, above the pockets. Applique in place.
Optional Step 4: Tuck a small toothbrush, a comb, toothpaste, a handful of band-aids, a travel pack of Advil, etc. Keep it for yourself, or give as a great gift! I made one of these up for my mom, husband, brother, etc, in lieu of Easter baskets this year, and tucked candy bars in with the other goodies! They were a huge hit.
Knit "Potter" Scarves
When I was in high school, I learned how to knit. I did this with the sole intention of making myself, and maybe some friends, Harry Potter house scarves.
I have never really stopped making them, and have gotten far more intricate in my designs. The first ones were very simple block stripes, straight boring knit the whole way, with relatively large needles. Now, they look more like this:
You will need:
2 balls primary color yarn
1 ball secondary color yarn
(I prefer Vanna's Choice or Carron Simply Soft)
Size 8 needles (this is not super important - you can size up or down to your taste)
Scissors
Cast on 28 with Primary color
Row 1: K2, P2 until end
Row 2: P2 K2 until end
Repeat, row 3-34
Change to Secondary color
Row 34-37: Repeat K/P pattern with secondary color
Change to Primary color
Row 38-43: Continue with Primary
Change to Secondary
Row 44-53: Continue with Secondary
Change to Primary
Row 54-59: Continue with Primary
Change to Secondary
Row 60-63: Continue with Secondary
Change to Primary, repeat Rows 1-63 until desired length
OR (in simple terms)
Cast on 28 with Primary color
Odd rows, K2, P2
Even Rows P2, K2
The pattern:
34 rows Primary
4 rows Secondary
6 Rows Primary
10 Rows Secondary
6 Rows Primary
4 Rows Secondary
Repeat until desired length
.
I have never really stopped making them, and have gotten far more intricate in my designs. The first ones were very simple block stripes, straight boring knit the whole way, with relatively large needles. Now, they look more like this:
You will need:
2 balls primary color yarn
1 ball secondary color yarn
(I prefer Vanna's Choice or Carron Simply Soft)
Size 8 needles (this is not super important - you can size up or down to your taste)
Scissors
Cast on 28 with Primary color
Row 1: K2, P2 until end
Row 2: P2 K2 until end
Repeat, row 3-34
Change to Secondary color
Row 34-37: Repeat K/P pattern with secondary color
Change to Primary color
Row 38-43: Continue with Primary
Change to Secondary
Row 44-53: Continue with Secondary
Change to Primary
Row 54-59: Continue with Primary
Change to Secondary
Row 60-63: Continue with Secondary
Change to Primary, repeat Rows 1-63 until desired length
OR (in simple terms)
Cast on 28 with Primary color
Odd rows, K2, P2
Even Rows P2, K2
The pattern:
34 rows Primary
4 rows Secondary
6 Rows Primary
10 Rows Secondary
6 Rows Primary
4 Rows Secondary
Repeat until desired length
.
Labels:
general,
gifts,
Harry Potter,
instructions,
knitting,
scarf
Thursday, April 11, 2013
Jar crafts
Around the holidays, everyone likes to put up all those recipe-in-a-jar things, but honestly, they are getting old. There are so many other cute and creative things you can do with jars that will last longer than those cookies! Here are just a few ideas.
A. Make a terrarium in a jar. I found some instructions, and this picture at the HGTV site. However, their instructions seem overly complicated to me. (Be warned, I am terrible with plants and growing things, but I do love them.)
So I did this my own way.
You will need:
- A jar
- pebbles or gravel
- potting soil
- a plant (I suggest a small succulent or cactus, or if you are as bad as I am, a nice fake silk plant.)
- decorations (twigs, moss, colored glass gems or marbles...whatever tickles your fancy!)
1. Wash your jar and dry it. Add a thin layer of gravel or small rocks to the bottom.
2. Add some potting soil.
3. Use chopsticks or a spoon to make an indent for your plant.
5. Decorate. Put in some pretty glass gems, some twigs, even a layer of moss or small glass animals and fake flowers. Anything you want to make it pretty and fun.
6. Water. When you water, use a very small amount, as there is little drainage.
7. Put someplace partly sunny and enjoy.
B. Make a keepsake jar.
Instead of buying dull picture frames, make a keepsake or memory jar of a special event or outing.
I first saw the idea here, at Women's World
You don't need much - just a jar and your bits and pieces! You may want a magic marker or paper label to write down the date and place the items are from.
1. Gather your treasures
2. Label your jar
3. Fill your jar with your treasures.
A few helpful tips:
- If you want to put small pictures in, use sand or small stones to hold your photo upright.
- Using long tweezers or chopsticks to get things right where you want helps immensly!
- If you are concerned about your treasures getting knocked out of place, dab a bit of quick-drying glue on the bottom as you place them, or even a small piece of double-sided tape.
C. Savings Jar
I just love putting change into a jar until it is finally full and I can find out all the money I didn't know I had.
Cute savings jars are simple to make.
You will need:
- A jar
- glue or tape
- decorations (I like to print out pictures and clip art)
2. If you are feeling mean, or need the extra motivation, glue a lid with a slit cut in it onto your jar. Metal canning jar lids make this tough, but coffee cans with plastic tops work great!
A few silly ideas to give these as gifts (with a small starter fund if you're feeling generous):
-boob-job jar for a close gal pal (with a sense of humor)
-retirement fund jar for parents/older friends and loved ones
-pirate booty jar for a younger child
-babysitter money for new parents
-iCoin for the tech and gadget guy in your life
-car money for a sweet sixteen
-beer money for the recent grad
-honeymoon fund for a bridal or jack and jill party
So save your jars and up-cycle them into something way more fun!
Labels:
decoration,
disney,
general,
gifts,
instructions,
vacation,
wedding
Tuesday, April 9, 2013
Hex Nut Jewellery
A dear friend taught me how to do these bracelets when I was looking for more crafty things I could do for guys, and I just adore them! They are super quick, inexpensive, and customizable.
You need:
Step 1: Cut one 18" piece of cord and one 36" piece. (If this is for someone with an especially large wrist, go bigger. Too much is always better than too little). Fold the 36" piece in half, add the 18" piece, and tie a knot in the end. Tape to your work surface.
Step 2: Braid cord for about an inch.
Step 3: Start adding hex nuts. Add one to the side you are about to brain into the middle, keeping the nut to the outside of the bracelet. I promise it's harder for me to explain than for you to actually do! Keep adding nuts this way until you are out.
Step 4: Braid the last inch or so and tie off, making sure to leave 2-3 inches in loose cord.
Step 5: Tie tiny knots in the ends of each remaining loose cord.
Step 6: Use these loose cords and the loop at the top to tie your bracelet onto your wrist.
Once you try it a time or two, these take all of five minutes to make, but add a nifty posh-grunge look to an outfit. I like to use them for steampunk outfits, as they are an easy way to get the industrial feel. I think this look would be great as the chain for a pocket watch or something along those lines. Next time, I might experiment with painting the nuts different colors.
As always, thanks for reading, and happy crafting! If there is a certain project or genre of craft you would like to see, please comment and let me know!
You need:
- About 4.5 ft of cord. (I used ribbon in this example, but it doesn't hold the neat angle look as well as something like parachute cord or leather)
- Scissors
- 20 hex nuts (I used 1/4" size, from the Home Depot. Bag of 25 for like $1.50)
- Tape or a clip to hold the string in place as you braid
Step 1: Cut one 18" piece of cord and one 36" piece. (If this is for someone with an especially large wrist, go bigger. Too much is always better than too little). Fold the 36" piece in half, add the 18" piece, and tie a knot in the end. Tape to your work surface.
Step 3: Start adding hex nuts. Add one to the side you are about to brain into the middle, keeping the nut to the outside of the bracelet. I promise it's harder for me to explain than for you to actually do! Keep adding nuts this way until you are out.
Step 4: Braid the last inch or so and tie off, making sure to leave 2-3 inches in loose cord.
Step 5: Tie tiny knots in the ends of each remaining loose cord.
Step 6: Use these loose cords and the loop at the top to tie your bracelet onto your wrist.
Once you try it a time or two, these take all of five minutes to make, but add a nifty posh-grunge look to an outfit. I like to use them for steampunk outfits, as they are an easy way to get the industrial feel. I think this look would be great as the chain for a pocket watch or something along those lines. Next time, I might experiment with painting the nuts different colors.
As always, thanks for reading, and happy crafting! If there is a certain project or genre of craft you would like to see, please comment and let me know!
Monday, April 8, 2013
Gift ideas - Simple and Fun DIY gifts
I always like to add personal, handmade touches to gifts for all occasions, so here are a few of my very favorites. They're inexpensive and fun, and are great to do with kids too!
1. Foot/Bath soak
You will need:
1. Foot/Bath soak
You will need:
- 6-inch square fabric scraps or coffee filters
- mint or lavender tea bags
- epsom salt
- powdered milk
- ribbon
- scissors
Put a small spoon of epsom salt and powdered milk in the middle of your fabric (or coffee filter). Cut open a tea bag and add half the contents to your fabric. Pull up the edges and wrap the ribbon tightly to seal the pouch. Tie off.
To use, just toss one little pouch into a hot bath and relax!
2. Decorative (and nice smelling) candles
You will need:
- Plain pillar candles
- coffee beans, cinnamon sticks, seashells, or whatever non-flammable decorations you want to use
- A blow-dryer
Pour the decorations you're going to use into a bowl or onto a plate. With the blow-dryer as war as it goes, carefully heat the bottom end of your candle until it is just a little soft. Roll in the decorations you chose. For extra pizzazz, tie a pretty ribbon or bit of lace around your candles.
3. Seed Tape (Great for the gardener in your life!)
You will need:
- seeds of your favorite garden plants or flowers
- 1" wide strips of black and white newspaper
- flour
- water
- paintbrush
Mix a few tablespoons of flour with a tablespoon of water, until it makes a thick paste. With the paintbrush, put a generous dollop of the paste every few inches along the newsprint strips (however far apart the seed directions say). Drop a few seeds onto each dollop. Allow to dry. To plant, simply lay the strip down and cover with a layer of soil.
Saturday, April 6, 2013
Fascinators!
Everyone loves a posh little fascinator. Since the WillKate wedding, they have been a huge fashion trend. And they are super easy, fun, and versatile! So here's a quick how-to, to get you started.
You will need:
6. Sew your barrette or comb onto the bottom of the hat.
7. Wear at a jaunty angle and bask in the glow of all the compliments you get!
You will need:
- Felt or fabric (a small scrap will do)
- A stiffening agent (I've used spray starch, iron-on interfacing, etc)
- A Needle and Thread (or glue)
- A barrette or hair comb
- Decorations (check out my instructions on how to make fancy feather decorations and some options if you want a veil.)
1. Cut your fabric into a small oval. If using interfacing, cut that to match, a half inch smaller than your fabric, and iron in the center.
3. Overlap the edges of the slit about an inch (more for a stronger curve, less for a more subtle one). Sew the overlap in place.
4. If using spray starch, spray your hat now and let it dry. If using interfacing, wrap the edges of your fabric around the interfacing and sew or glue in place.
5. Attach your decorations over the sewn seam, covering it from view if possible. I sewed mine on, but hot glue or even superglue is also an option if you are not handy with a needle. (I went crazy and put on a veil and a bow and some sparkly bits and feathers)
6. Sew your barrette or comb onto the bottom of the hat.
7. Wear at a jaunty angle and bask in the glow of all the compliments you get!
Labels:
costume,
fascinator,
general,
hat,
instructions,
renaissance,
steampunk,
veil
Friday, April 5, 2013
Enchanting Floral Centerpieces
Wedding flowers are expensive, no matter how simple you want to do them. For my own wedding last summer, I wanted to really go all out and be a fairy princess. Fairy princess flowers were waaaaay out of my price range. However, with a bit of time and about $70.00 at the local Dollar Tree, I made 15 of these beautiful, everlasting centerpieces.
For each one, you will need:
- 1 glass taper candle holder
- 1 glass bowl vase
- hot glue gun
- wire cutters
- floral tape
- various silk/fake flowers (I went with a central rose, some colorful filler flowers, and some decorative grass, but you can get this same look with whatever flowers you like best)
- 2 bags glass gems
- 1-2 flameless led tea lights
Step 1: Glue the bowl vase on top of the candle holder. (The one in the picture is not on a candle holder stem, but for an idea of how it looks, check here.
Step 2: Pour glass gems into bowl.
Step 3: Use wire cutters to clip fake flowers to single stems.
Step 4: Arrange your flowers in a pyramid or cone shape, starting with the central flower.
Step 5: Wrap the stems of the flowers together, covering the bottom 3 inches or so. Use the wire cutters to trim any excess and adjust length
Step 6: Turn on tea lights and place in the bowl. Place flower arrangement into bowl. Enjoy your beautiful new centerpiece!
Feel free to add decorations, play with colors, etc! Make a big, lovely bow to add!
Step 2: Pour glass gems into bowl.
Step 3: Use wire cutters to clip fake flowers to single stems.
Step 4: Arrange your flowers in a pyramid or cone shape, starting with the central flower.
Step 5: Wrap the stems of the flowers together, covering the bottom 3 inches or so. Use the wire cutters to trim any excess and adjust length
Step 6: Turn on tea lights and place in the bowl. Place flower arrangement into bowl. Enjoy your beautiful new centerpiece!
Feel free to add decorations, play with colors, etc! Make a big, lovely bow to add!
Thursday, April 4, 2013
Disney Vacation Countdown Calendar
My husband and I are going on a second honeymoon/pre-kids Disneyworld trip in the near future. With him just finishing grad school, it helps to have something to look forward to through the long New England winter. With that in mind, I made this Disney vacation countdown plaque that is decorative and fun!
I should warn, it turned out to be a longer process than anticipated.
You will need:
A castle printout, scaled to the size you want - I googled Disney castle silhouette and found a perfect one
A wooden plaque
1 sheet Black scrapbook paper (I used the glitter kind because SPARKLES!)
1 sheet Fireworks-y scrapbook paper
Scissors
Modgepodge
1/8 inch ribbon
Tape
A sample countertop card from the hardware store (with a shiny finish)
Superglue
Paintbrush
Hammer
Picture Hanger
1. Trace your printout onto the back of the black scrapbook paper. Cut out your castle.
2. Trace the shape of your wooden plaque onto the fireworks paper, leaving a 1/4 to 1/2 margin for safety.
3. Mod-podge your fireworks background onto the face of the wooden plaque. Position and mod-podge your castle in the center of that. Allow to dry.
4. Layer a few coats of mod-podge over your whole plaque, allowing to dry in between. Be liberal. (I literally poured it on.)
5. Wrap the edge with your ribbon to finish the edges nicely. Dot with superglue every few inches to hold the ribbon in place.
6. Tie a ribbon on the countertop sample card. Glue the end to the back of the plaque.
7. Hammer the picture hanger to the back of the plaque.
8. Hang on the wall.
9. Use a dry or wet erase marker to write on the sample card.
10. Enjoy your vacation!
I should warn, it turned out to be a longer process than anticipated.
You will need:
A castle printout, scaled to the size you want - I googled Disney castle silhouette and found a perfect one
A wooden plaque
1 sheet Black scrapbook paper (I used the glitter kind because SPARKLES!)
1 sheet Fireworks-y scrapbook paper
Scissors
Modgepodge
1/8 inch ribbon
Tape
A sample countertop card from the hardware store (with a shiny finish)
Superglue
Paintbrush
Hammer
Picture Hanger
1. Trace your printout onto the back of the black scrapbook paper. Cut out your castle.
2. Trace the shape of your wooden plaque onto the fireworks paper, leaving a 1/4 to 1/2 margin for safety.
3. Mod-podge your fireworks background onto the face of the wooden plaque. Position and mod-podge your castle in the center of that. Allow to dry.
4. Layer a few coats of mod-podge over your whole plaque, allowing to dry in between. Be liberal. (I literally poured it on.)
5. Wrap the edge with your ribbon to finish the edges nicely. Dot with superglue every few inches to hold the ribbon in place.
6. Tie a ribbon on the countertop sample card. Glue the end to the back of the plaque.
7. Hammer the picture hanger to the back of the plaque.
8. Hang on the wall.
9. Use a dry or wet erase marker to write on the sample card.
10. Enjoy your vacation!
Tuesday, April 2, 2013
Bows! And how to make them
Bows are some of the most versatile
decorating staples. I like to use them in flower arranging and
holiday décor, but they can also be added to hats, clothing,
accessories, stuffed animals, anything you want to fancy up a bit.
Once you know the technique, you can make them as big or tiny as your
project calls for. And those expensive pre-made bows are simple and
quick to make at home for much less money! Here's how.
Materials:
Ribbon (preferably wired)
Scissors
Floral wire or thin string (even heavy
thread will work)
Directions:
- Cut your wire or string to about one foot. Set aside.
- Leave a tail of ribbon a bit longer than you want it to be in the end.
- Make a loop and hold the ends firmly in one hand.
- Twist the ribbon where the center of the bow will be.
- Make a loop on the other side. Twist. Hold firm in the middle.
- Repeat until you have as many loops as you desire. (Don't worry about squishing the loops, you can fluff them when you're done!)
- Cut the other ribbon tail, again, an inch or two longer than you want it to be.
- Take your wire and lay it across the middle of the bow.
- Fold it in half and twist the two ends behind the bow. It helps to fold the loops over the wire.
- The most important part of this is making sure to twist the wire good and tight.
- Fluff your bow.
- Trim the ends to the desired length, giving them fancy cut ends if you so desire.
- Ta da! Done! Use the wire ends to attach to projects or trim short if you want to glue or sew the bow onto something.It seems like a bunch of steps, but once you get the hang of it, you will be able to make these in a matter of minutes!
Saturday, November 3, 2012
How to Make Fancy Feather Decorations
I love using feathers to decorate
different craft projects. There are a ton of different fancy
feathers you can buy at the craft stores, but they can get quite
expensive. Instead of buying one or two of these, you can buy a bag
of loose, colored feathers and make a bunch of your own, however you
need them. It is very, very simple.
You will need:
Feathers
Glue
a Pin
Wax or Parchment paper
Scraps of Fabric or Felt
Step 1: Prep your materials. Lay down
a sheet of parchment paper or wax paper on your work surface. (This
will prevent the project from sticking, and will peel off without
leaving schmutz behind). Lay out your feathers, pour a small amount
of glue into the corner of the paper.
Step 2: Form the base. Pick a long,
strong feather to be the backbone of your project. Use your pin to
apply a line of glue to the stem of it. (The pin will help you be
very precise and not use gobs of glue).
Step 3: Lay your feathers on. Layer
feathers in a zigzag, one pointing one way, the next pointing the
other, applying glue to the stems as you go until the decoration is
the size and shape you desire.
Step 4: Build a stem. Use a few small
feathers, doused with a bit of extra glue, and lay them at the base,
building a stem for your decoration.
Step 5: Let the feathers dry
completely.
Step 6: Peel the decoration from the
paper. It should come off easily.
Step 7: Wrap the stem. Apply glue to
the back side of of the fabric or felt, and wrap around the stem of
the decoration. Allow to dry. Trim off the very bottom, so it is
nice and clean. This wrapping will allow you to sew or pin your
feathers to whatever project you want with ease.
Here is a finished one I used to fancy
up a fascinator hat.
Here is another that is a bit more
streamlined and sleek, that I used to decorate for a black and blues
party.
Happy Crafting!!
Subscribe to:
Posts (Atom)